Archive for the ‘DIY’ Category

Hi all,

This is one of the most controversial upgrades out there as many people will go straight to a GT3 upgrade and many others don’t know how to do this.  So, to find a complete DIY has in my experience been historically impossible.

So, why go with a Turbo upgrade?  Well the larger rotors and calipers allow for about 35% more pad surface to rotor versus the C2 and also allows for rapid heat displacement in harder applications such as track usage.  Yes, they are also red and have a “cool” factor that comes along with doing the upgrade… however if that is all you want out of this I’d just powder coat your original ones!

GT3 versus Turbo… Well the issue here is that you will not be able to use GT3 front rotors due to the offset being all wrong for a C2.  You can however use Turbo rotors.  The GT3 calipers are six piston versus the Turbo four piston so there is a more dramatic braking performance gain.  There is also a massive increase in the budget and since there are a few totalled Turbos out there and people that upgrade to six piston GT3 or Brembo kits, a set of stock Turbo calipers can be found much easier for much less.  So, I went Turbo…

Now the following information on what you need would not be possible without Steve Weiner’s help from Rennsport Systems.

You will need to replace the following items on your C2 if you wish to do this:

  • Front wheel carriers and hubs (rears stay unchanged)
  • Master cylinder with one from a C4S or Turbo (same part number) to handle increased volumetric requirements – My C2 has PSM and both C4S and Turbo has it as well
  • 996 Turbo front and rear calipers
  • 996 Turbo front and rear rotors
  • 996 Turbo front and rear brake lines

After about a month of searching I was able to source the parts with costs as follows (in USD):

  • Full 996 TT brakes with rotors, pads, calipers, and lines: $600 – Used, 6speedonline.com
  • Front L/R Wheel Carriers and Hubs complete: $800 – Used, LA Dismantlers
  • Master Cylinder from C4S/Turbo: $323 (went with a new one, used is $250) – Suncoast Porsche
  • Front bearings (optional, but while they are off…): $62.84 each (x2) – Suncoast Porsche

Total cost, with the optional of:  $1,848.68 USD

Cheers
Aaron

———–

REFERENCE INFORMATION

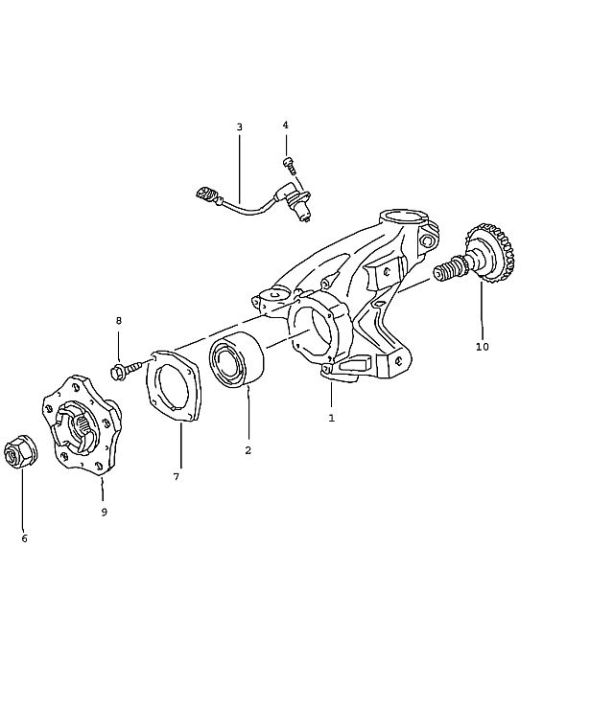
Just in case you don’t know what a wheel carrier is/looks like, here is an exploded diagram of what one looks like from a 996 Turbo:

ttwc1

Hi everyone,

First off, I did not write these directions and the information and images below were taken from Renntech.org and put here for the purposes of supplying a single point of information.  The first thing I need to do is tackle the brake and suspension projects on the list so I need to get the car fully on stands… this is where it begins.

Cheers
Aaron

—————

One of the questions that comes up frequently is what is the best and safest way to put your 996/986/997/987 up on jack stands. The chassis and jack points are the same for all models, and lifting the car up off of all 4 wheels is easy. Here is a little DIY instruction on how I do it.

The 4 lift points as described in your owners manual are where you support the car with Jackstands. Here is the jack stand that I use. Any Jack stand with at least a two to three ton rating will do.

First, you put the front jackstands on by lifting the car from the rear lift point. Using a standard hydraulic jack, lift the car up on one side so that both wheels are off the ground, and the front is high enough to clear the jack stand.

Here is the front lift point.

After you have one jack stand placed, lower the jack, and do the other side. The car is so stiff, that the other sides front wheel will come up off of the ground. Other side is just like the first.

Note the orientation of the lift points and how the jackstands are arranged.

Next you have to lift the rear. There are 2 places that mechanics use as a lift point for the rear. One is the rear sub-frame cross member that is below the engine and the transmission, and the other is on the rear engine case just behind the oil sump cover. I prefer lifting from the engine case because my jack does not clear the engine oil sump to reach the crossmember.

There is a large metal stub that is cast into the engine case. That is where you lift, making sure that your jack does not contact the oil sump cover casting. Center the jack on the engine or on the subframe and lift the car high enough to put the remaining stands on the 2 rear lift points.

And with that you are done.

Just take your time and make sure that each jackstand is centered and aligned properly on the lift points and you will have no problems.

One last thing, it is to your advantage to break the torque on all of the lug nuts before your lift the car up off of the ground. Also when you are lifting the car, make sure it is on a level surface, and the car is in neutral and the parking brake is off so the car can pivot on its wheels as it is lifted.

Lowering the car is the opposite of the above. Once you get the hang of this, you can have your car up in the air in under 5 minutes.

ADDITIONAL DETAIL

Look under your engine, and find the oil sump cover. That is the big square plate that is held in with several bolts around its edges. It has a hex head bolt in the center of it which is the oil drain.

Now, looking toward the back of the car just behind the oil sump cover in the center of the engine case centerline there is an area where the case is very sturdy looking. That is where you place the jack. Notice that it is centered on the sturdy area, and not touching the sump cover.
If you are still unsure, just look at the centerline seam of the engine case behind the sump cover, find the thickest portion of the case just behind the sump cover, and put your jack there.

For the Saddle type floor stands, I place the front ones on the square part of the car’s lift point, with the saddle pointing left and right. By placing the saddle left/right on the lifting point, the car will pivot on the saddle as the car is lifted from behind.

The rear floor stand is positioned up/down on the round part of the rear lift point of the car. With the jack stands oriented this way, they lock the car in place, and make it very hard to inadvertently push the car off of the stands if someone leans on the car, or it gets bumped.